在iOS9中,苹果将原http协议改成了https协议,使用TLS1.2 SSL加密请求数据
解决方法
在info.plist中添加
1 2 3 4 5 6 7 8 9 10 11 12 | |
在iOS9中,苹果将原http协议改成了https协议,使用TLS1.2 SSL加密请求数据
在info.plist中添加
1 2 3 4 5 6 7 8 9 10 11 12 | |
1 2 3 4 5 6 7 8 9 10 11 12 13 14 15 16 17 18 19 20 | |
第一步创建UILabel及NSMutableAttributedString的实例对象,之后的效果改变都是作用在它们上面:
1 2 3 4 5 6 7 | |
字体 颜色 背景色
NSFontAttributeNameNSForegroundColorAttributeNameNSBackgroundColorAttributeName效果

代码
1 2 3 4 5 6 | |
下划线
NSUnderlineStyleAttributeNameNSUnderlineColorAttributeName效果

代码
1 2 3 4 5 6 7 | |
描边
NSStrokeColorAttributeNameNSStrokeWidthAttributeName效果

代码
1 2 3 4 5 6 7 | |
阴影
NSShadowAttributeName效果

代码
1 2 3 4 5 6 7 8 9 | |
字符间隔
NSKernAttributeName默认间隔
间隔为5
代码
1 2 3 4 5 | |
字体倾斜
NSObliquenessAttributeName效果

代码
1 2 3 4 5 | |
字体扁平化
NSExpansionAttributeName效果

代码
1 2 3 4 5 | |
添加图片
NSAttachmentAttributeName效果
代码
1 2 3 4 5 6 7 8 | |
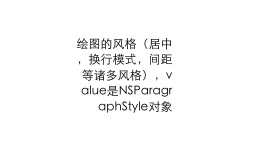
绘图风格
NSMutableParagraphStyle效果
代码 自定义TextView类
1 2 3 4 5 6 7 8 9 10 11 12 13 14 15 16 17 18 | |
ViewController中添加代码
1 2 3 4 | |
Demo地址:点此查看
当前时间的 年 月 日 时 分
1 2 3 4 | |
今天是今年的第几周
1 2 3 4 | |
指定年 月 日 时 分 秒 得到 NSDate
1 2 3 4 5 6 7 8 9 10 11 12 13 14 | |
7天12小时之后
1 2 3 4 5 6 7 8 9 10 11 12 | |
这个月有几天
1 2 3 | |
NSString
以@方式生成的字符串,会作为字符串常量,在程序过程中,会一直存在,占用着内存。
1 2 3 | |
IOS7判断
1
| |
屏幕宽高
1 2 | |
颜色
1 2 3 4 5 6 7 8 | |
图片
1 2 3 4 5 | |
weakSelf
1
| |
重写NSLog,Debug模式下打印日志和当前行数
1 2 3 4 5 | |
判断是真机还是模拟器
1 2 3 4 5 6 7 | |
最简单的图文混排就是用webView去实现,如果已经在html源码中添加了不同设备的适配,其中的文字就会自动换行,但是图片如果大过屏幕的宽度,html的约束就会失去效果,这样webView显示出来后图片显示不全,出现了可以左右滑动的情况.解决方式如下:
这种情况一般
webView.scalesPageToFit = YES也无效
1 2 3 4 5 6 7 8 9 10 11 12 13 14 15 16 17 18 19 20 21 22 23 24 | |
在webView中长按就会弹出拷贝等功能的弹窗,如果图片或文字添加了超链接还能进行跳转.通常我们看别人的app里的图文控件是不是webView,用这种方式就可以看出来. 如果你不想让别人看出来你这是webView,添加以下代码
1 2 3 4 5 6 7 8 9 10 11 12 13 14 15 16 17 18 19 | |
UIWebViewNavigationType枚举:
如果不想在网页加载失败的时候出现404扫兴,就添加代码吧!
1 2 3 4 5 6 7 8 9 10 11 12 13 14 15 16 17 18 19 20 21 22 23 24 25 | |
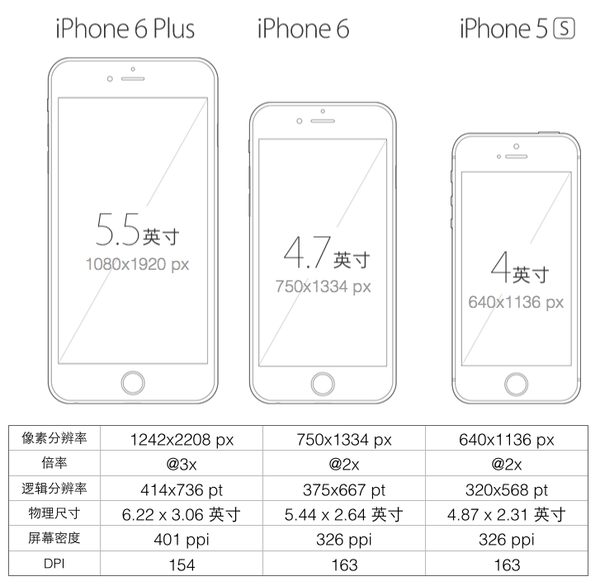
屏幕大小尺寸,也就是app启动图片的尺寸大小,取下图中的像素分辨率
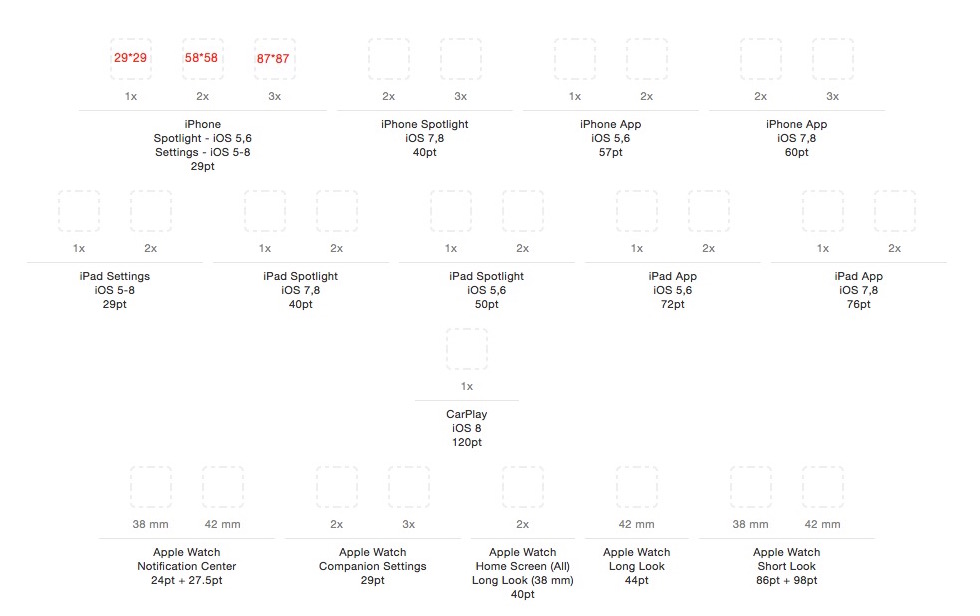
图标大小计算方式如iPhone 29pt所示:
- 1x: 29pt * 1
- 2X: 29pt * 2
- 3x: 29pt * 3
另:上架时,还需要一张1024*1024的图标
创建新文章
1
| |
生成的文件在~/source/_posts目录下
编辑文章
1 2 3 4 5 6 7 8 9 10 | |
安装Octopress主要需要两个东西
git
ruby
git:mac上都默认安装
ruby:mac默认安装.不过按官方要求是需要1.9.3的版本
1.安装Homebrew
1
| |
2.安装Rbenv
1 2 3 | |
3.安装低版本ruby
1 2 3 | |
使用ruby --version命令查看版本号
开始安装octopress
1 2 3 4 5 6 7 8 9 10 | |
设置github和Octopress的关联
第一步要做的是去github创建一个username.github.io的repo
运行如下命令,按照提示完成关联
1
| |
如果github没有添加SSH keys
首先创建SSH keys,终端敲入:ssh-keygen,根据系统提示进行设置.
生成的SSH keys保存在: ~/.ssh拷贝生成的文件内容,将其添加至github帐号管理的SSH key中,就可以克隆github上的代码库了.
首先把工程clone下来,切换到source分支
另外需要把master clone到_deploy目录中
1 2 3 4 | |
高德文档描写如下:
1 2 3 4 5 6 7 8 9 10 11 | |
实际情况
[MANavigation openAMapNavigation:config] 返回为成功解决方法
pod 'AMap2DMap', '~> 2.6.0'代码修改如下:
1 2 3 4 5 6 7 8 9 10 11 12 | |
使用情况
解决方法,代码如下
1 2 3 | |